How to Build an Automatic SEO Sitemap in Next.js 15 with Prisma
The Power of Automation: Dynamic Sitemaps in Next.js 15
If you want your website to rank on the first page of Google, you need to speak Google’s language. That language is XML. A sitemap is essentially a map of your website that tells search engine crawlers which pages are important and how often they change.
When I started building Wisemix Media, I knew that manually adding every new blog post to a sitemap file was impossible. Working 10 hours a day in a labor job in Saudi Arabia means I need automation. In this guide, I will show you how to build a sitemap that updates itself using Next.js 15 and Prisma.
1. Why Use a Dynamic Sitemap?
Most beginners use a static sitemap.xml file in their public folder. The problem? Every time you write a new post, you have to edit that file.
By using a Dynamic Sitemap:
Instant Indexing: As soon as you hit "Publish" in your Prisma-powered dashboard, the sitemap is updated.
Zero Errors: No broken links or forgotten pages.
Better Crawl Budget: You tell Google exactly which pages are high priority (like your Image Resizer tool) and which are low priority (like your Privacy Policy).
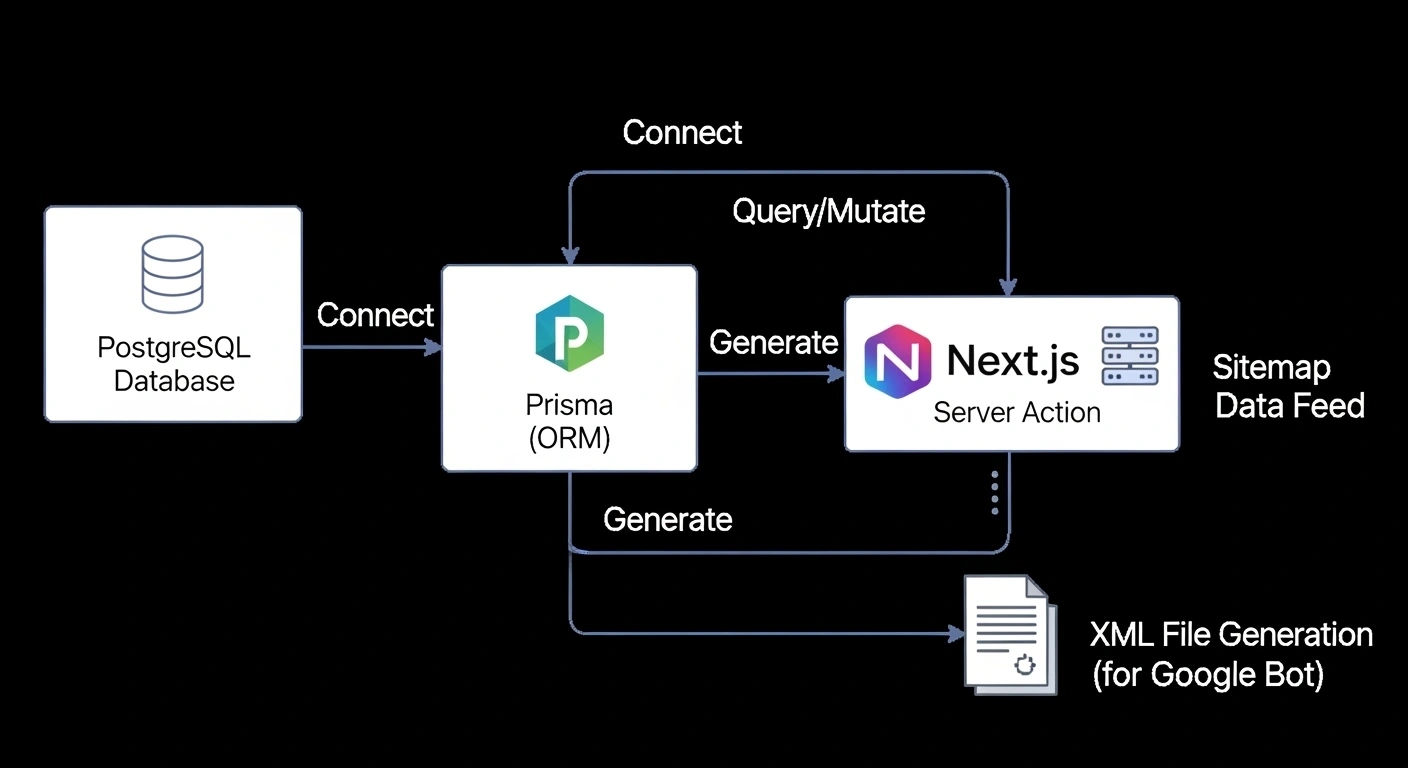
2. The Architecture: How It Works
We use the Next.js File-based Metadata API. Instead of a static file, we create a sitemap.js (or .ts) file in the app directory. Next.js treats this as a special route and generates the XML output for us automatically.
3. Step-by-Step Implementation with Prisma
Step 1: The Setup
First, ensure your Prisma client is ready. We will query the database to get all the "Slugs" of our blog posts.
Step 2: Creating the Sitemap Function
In your app/sitemap.js file, add the following professional logic:
JavaScript
import prisma from "@/lib/prisma";

export default async function sitemap() {
  const baseUrl = "https://www.wisemixmedia.com";

  // 1. Fetch all published posts from PostgreSQL
  const posts = await prisma.post.findMany({
    where: { published: true },
    select: { slug: true, updatedAt: true },
  });

  // 2. Map posts to Sitemap Format
  const postUrls = posts.map((post) => ({
    url: `${baseUrl}/blog/${post.slug}`,
    lastModified: post.updatedAt,
    changeFrequency: 'weekly',
    priority: 0.7,
  }));

  // 3. Define Static Pages (Home, Tools, etc.)
  const staticPages = [
    { url: baseUrl, lastModified: new Date(), changeFrequency: 'daily', priority: 1.0 },
    { url: `${baseUrl}/tools/image-resizer`, lastModified: new Date(), changeFrequency: 'monthly', priority: 0.8 },
    { url: `${baseUrl}/contact`, lastModified: new Date(), changeFrequency: 'monthly', priority: 0.5 },
  ];

  return [...staticPages, ...postUrls];
}
4. Understanding the Parameters (SEO Education)
In the code above, we used three critical SEO tags:
<lastmod>: This tells Google when the page was last updated. Since we useupdatedAtfrom Prisma, Google knows exactly when you improved a blog post.<changefreq>: For your Home Page, we usedailybecause you post often. For your Image Resizer tool, we usemonthlybecause the tool code doesn't change every day.<priority>: This ranges from 0.0 to 1.0. I give the Home Page 1.0 and blog posts 0.75. This tells Google to spend more time crawling your main landing pages first.
5. Testing and Submission
Once you deploy this code to Vercel, your sitemap will be live at wisemixmedia.com/sitemap.xml.
The Final Step: 1. Go to Google Search Console. 2. Click on Sitemaps. 3. Enter sitemap.xml and click Submit.
Google will now "subscribe" to your sitemap. Every time you add a post through your Prisma dashboard, Google will see it automatically.
Conclusion
Building a dynamic sitemap is a hallmark of a professional developer. It bridges the gap between your database and search engines. By combining the speed of Next.js 15 with the relational power of Prisma, you create a website that is not just fast, but also smart enough to handle its own SEO.
If I can build this while working 10 hours in the fields of Saudi Arabia, you can definitely implement this in your next project!